
Caring for and displaying your Chinese propaganda posters
Whether you're planning on starting a collection of vintage Chinese posters or just want a couple on your walls as interesting and unique decoration, one of the most common questions we're asked is how to properly frame your poster for display. Once you’ve made an investment in an authentic historical artwork, you naturally want to make sure that it’s going to be protected for many years to come. The poster you buy will most likely already have been preserved and passed through the hands of several owners since printing, and it seems right that we should also make our best efforts to conserve them for future generations to enjoy.
When I first started collecting original Chinese propaganda posters I was impatient to get them up on the wall and, having already spent money on acquiring them, slightly less concerned with the way in which they were framed. Then once I’d seen at first hand how quickly natural light can fade a vintage artwork, I was persuaded to reconsider my framing options. What began as a niggling worry about some of the materials used grew to the point where I eventually had to take my posters off the wall and reframe some of them. Here’s how to save yourself some of the time and money I wasted!
What type of glazing?
I mention this first as it’s arguably the most important consideration when framing original poster artworks. No matter how much care has been taken with other material selections and framing techniques, natural light – and in particular direct sunlight, will cause the most rapid deterioration of a vintage printed poster. Standard ‘float’ glass, which is by far the cheapest option for picture framing, blocks around 40 percent of harmful UV light, but isn’t adequate for any valuable artwork. UV resistant glass and acrylics are fortunately available that provide varying levels of protection – up to around a 99 percent block in UV light. The catch is that they are considerably more expensive.

Types of UV glazing
Several different types of glass are available with differing levels of UV protection and reflectiveness. The anti-reflective types, some of which appear almost invisible in front of the artwork, are more expensive and generally offer slightly lower levels of UV protection. For my own posters I most often use a brand called Artglass 99™, which offers 99 percent UV protection while remaining fairly cost-effective. UV-resistant acrylic is also available but is extremely expensive. Acrylic is recommended for very large posters (over 1m²) or where children are present and glass could cause a safety risk. Just remember that while significantly reducing deterioration to vintage artworks, even with UV glazing it’s still not advisable to hang posters where they will be in direct sunlight.

Mounting your vintage poster
The next consideration is how your vintage poster is to be attached inside the frame. When framing an inexpensive poster, one standard technique is to dry-mount the artwork to an undermount. This forms a permanent bond, and has the advantages of creating an attractive smooth finish to the poster and also making it easier to handle for framing. For original vintage posters though, mounting in this way effectively destroys value as the process is non-reversible. Collectors usually won't touch a poster that has been irreversibly mounted.
You should also avoid framing your poster against the glazing. Changes in temperature and humidity can cause condensation to form on the inside of the glass and harm the artwork. Worst case scenario, the poster will become stuck to the glazing. While you might get away with this in the short term it’s not recommended for any valuable item, particularly if you live in a hot climate where air conditioning usage can cause large fluctuations in temperature.
Which kind of mount?
A standard method to frame a valuable poster is in a window mount. This consists of an undermount, on which the poster sits, and a top mount, or ‘window’, which sits on top of the poster and forms a border around its margins. The two mounts should be hinged together along the long edge with conservation-grade gummed paper tape or linen tape, so they will open like a book. The window or border mount should overlap the edges of the poster by at least 5mm. The window mount serves two functions – to enhance the artwork visually, and to distance the poster from the glazing.
It is possible to frame a poster without a window mount, using spacers made of conservation grade materials placed under the rebate or lip of the moulding to prevent the poster from sitting against the glazing. Called ‘close-framing’, this has the effect of making the frame smaller, as there is no border around the poster’s edge. Some people also prefer the look aesthetically. My own preference however is to use a window mount, as I dislike the extra work involved with this and prefer the convenience of the ‘sandwich’ method mentioned below.
For the mountboard itself you should only be considering conservation or museum-level boards, of at least 1100 microns (1.1mm) thickness. Museum-standard boards are 100 percent cotton and naturally lignin-free, while conservation boards have been treated to the alkaline end of the pH scale at time of manufacture. When using standard mountboard the bevelled cut of the window mount will eventually turn brown and this acid can migrate onto the artwork causing stains, so it should be completely avoided. I tend to use museum board for around 70 percent of my own posters, using conservation board for the less valuable items in my collection. Conservation and museum-level boards are obviously more expensive than budget board, but the cost increase isn’t significant in comparison to UV glazing versus ordinary float glass.

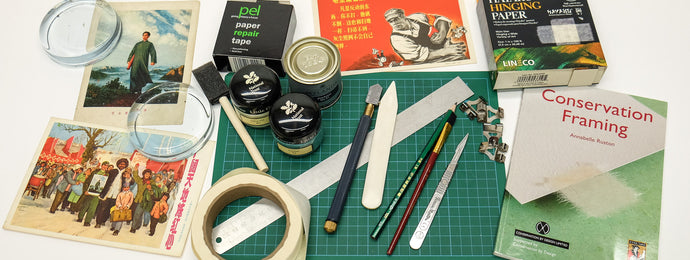
Attaching your poster to the mount
Please forget about Sellotape and masking tape. Never use self-adhesive tapes of any kind to attach your poster to the mount. They are very difficult to remove and might damage the poster, they eventually dry out and fail, and the adhesive itself could be harmful to the paper over time. The traditional, museum-level method is to use Japanese paper and wheat-starch paste, but several manufacturers offer convenient, archival paper tapes for this purpose that come with a water-activated adhesive on one side. There are several different hinging methods to attach the poster to the mount but the most common is the T-hinge or pendant tab. For a portrait-format poster of the standard size we sell at eastredgallery.com you would use two T-hinges affixed to the rear of the poster at the top, about a quarter of the way in from each edge. For a landscape poster you could use three hinges along the top edge to prevent any sagging in the centre. See this link for a great video on conservation mounting and T-hinges.
It’s only necessary to fix around 5mm of the tape to the back of the poster – the artwork is very light and the hinge should be the weakest part of the framing package, to prevent the poster itself tearing if the frame is handled badly. About 5mm of the tape should be moistened with a brush using a very small amount of purified water. When the water has soaked into the adhesive it can be affixed to the rear of the poster, then left to dry under a paperweight. Once dry, the poster is positioned on the undermount and the window mount closed to check if it is correctly placed. Once you have the exact position, the poster can be temporarily held in place with a paperweight. The horizontal tab of the T-hinge can now be stuck down across the upright vertical tab, securing the artwork to the mount. Never attach your poster to the window mount – it should be possible to open the mount like a book with the poster secured to the undermount.
Using archival gummed tape to secure your poster to the mount means that you won’t be causing any unnecessary damage to the artwork, and crucially, the tape is removable. A small amount of water applied to the back of the tape will soak into the paper and allow the tape to be removed in the future as necessary.

The framing ‘sandwich’
Another useful tip is to secure the glazing to the window mount and undermount with archival tape. This seals the undermount, window mount, and glazing together in a ‘sandwich’ which, as well as being more convenient to handle when placing into a frame, has the advantage of sealing the artwork from dirt ingress, humidity, and insects such as thunderflies, or storm bugs. These tiny bugs mange to crawl inside frames (and computer monitors) and then perish, usually on top of your pristine white mount. Sealing the frame usually manages to remedy this issue - see this video for an explanation of sealing the mount package into a sandwich.

Fold marks and ripples
Some of the posters we offer will have been folded upon issue to make them more convenient for distribution, and while they are likely to have been stored flat for many years, it is often still possible to see the fold marks. If previously folded this will always be noted in the item condition section on the product page. Once framed in a window mount, a poster should lie relatively flat and it depends on personal preference as to whether you think it would significantly detract from the poster’s appearance. Personally, for my own collection I tend to accept fold marks as part of the history of the artwork and in most cases will frame them as they are. On a few occasions however, I have had posters backed to linen or Japanese paper before framing. We can arrange this service for you if required.

Using the mounting methods mentioned above, your artwork will only be secured to the undermount by small hinges at the top edge. This is the safest way to ensure the preservation of your poster: it's free to expand and contract with climate fluctuations. However particularly with larger posters you may see a small amount of rippling down the length of the artwork as it hangs freely inside the mount. This is really just an occupational hazard of conservation mounting, where you are sacrificing a small amount on the aesthetic side while gaining in the preservation of your artwork. Again though, if you want things to look perfect you can opt to have the poster backed to linen or Japanese paper. Both methods will help to flatten out the poster.
Moulding choices
This is another matter of personal preference but a good framer will guide you in selecting an appropriate moulding to construct your frame from. There are thousands of choices from bare wood to veneers, polymer, and aluminium. The main consideration is whether the moulding will be sturdy enough to support the weight of the framing package – and note that glass is obviously much heavier than acrylic. For this reason you may be steered away from picking the skinnier mouldings that many people find to be quite stylish. For the majority of my personal collection I prefer to use bare wood mouldings, hand-finished with a complementing paint colour, the advantage being that I can select an exact tone from the poster and find a matching paint. For extra protection, it’s possible to line the inside of the rebate of a moulding with special tape that uses an aluminium barrier to prevent acid migration from the wood.

Backing board
The backing board goes into the frame behind the undermount, is fixed into the frame with a point driver, and then the rear of the frame is sealed either with tape or kraft paper depending on your location. In the UK, MDF is still one of the most popular choices for backing board and while it’s highly acidic can still be used as long as you have a high-quality undermount between it and your poster. A better choice is one of the several varieties of pH neutral backing board that are available, and resemble a high-quality, rigid and lightweight corrugated cardboard. Boards with waterproof coatings can be used if your frame will be hung in a moist or damp environment.

Choosing your framer
A good start is to find a framer who is a member of a professional trade association – in the UK this is the Fine Art Trade Guild (FATG), and a member who has gained their accreditation can add the acronym GCF (Guild Commended Framer) after their name. In the US the equivalent is the Professional Picture Framers Association (PPFA). These organisations require their members to pass exams and have specific standards for particular levels of framing. In the UK the two top levels are conservation and museum standard, and you should look at considering conservation level for a valuable vintage poster.
A framer who encourages mounting your valuable poster down to board is obviously to be avoided, and it might pay to be slightly wary of any who need to specially order-in conservation materials – as they may rarely encounter conservation-level jobs and lack the required experience. Many people are shocked when they find out how much a conservation framing job will cost, but it has to be accepted as part of the expense when displaying valuable historical items. I decided many years ago to take up framing to try to sidestep the expense of bespoke conservation framing for my own poster collection. While it is possible to construct your own frames using tools aimed at the hobby framer, you come to realise that the most professional results come from professional equipment and experience. A decade later I have a workshop filled with professional framing equipment. If you just want to get your poster up on the wall quickly, there’s nothing stopping you from sticking it in a clip frame from IKEA, but just remember that it’s a temporary solution!
Let me know in the comments if that's any help to you or if you have any specific questions.
Thanks for your question Stephanie – I’d guessed I may have to answer this so I think I’ll amend the blog. The answer is that it depends (sorry). If you want to preserve your poster correctly you’ll have to pay a framer to do a proper conservation job and it’s not usually cheap. I can only speak for prices in the UK however. Question I ask myself is: will I be upset if this poster fades in a few years? If the answer is yes, you should find a conservation framer.
Hi there,
Just read your blog on framing, very informative! How much would it cost to frame one of your posters to conservation standard please? I’m in Canada.